
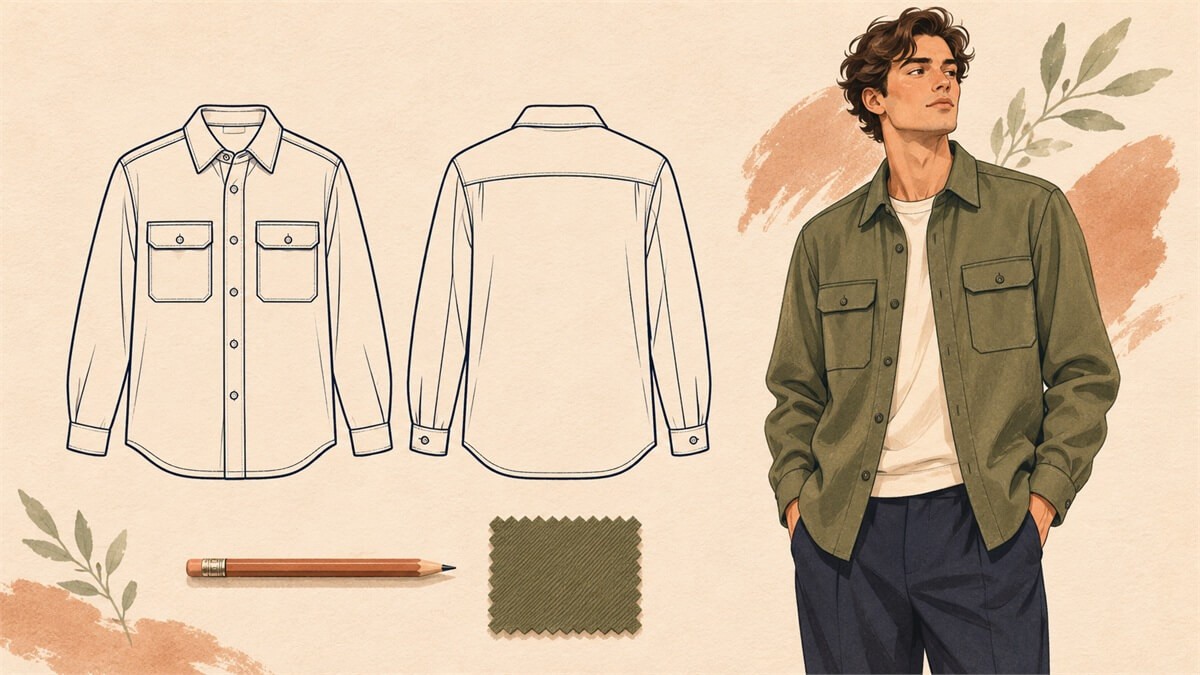
In fashion, CAD means computer-aided design. People often use “fashion CADs” to mean digital garment drawings, particularly technical flats and colourways. The term can also cover pattern software and 3D development, so it is worth asking what someone means before commissioning a set of files.
A technical flat communicates the garment’s shape and visible details. A fashion illustration communicates a look, mood or way of wearing it. Both are useful, but they serve different purposes. Neither automatically supplies everything a factory needs to make the product.
Technical flats, illustrations, patterns and 3D views
| Output | Main purpose | What it does not prove |
|---|---|---|
| Technical flat | Shows a garment clearly, usually through front and back views plus details. | That the measurements, fit or construction have been tested. |
| Fashion illustration | Communicates styling, proportion, movement and visual mood. | That the drawing contains a complete manufacturing specification. |
| Pattern | Defines the pieces used to cut and construct the garment. | That the finished fit is approved without suitable development and checks. |
| 3D garment view | Helps explore a garment digitally using patterns, material settings and an avatar. | That a physical garment will behave identically without validation. |
Adobe’s introduction to fashion illustration distinguishes expressive illustration from technical flats used to communicate a design to a maker. In practice, a project may need several of these outputs at different stages.
What a useful technical flat should show
Draw the garment so its structure is easy to read. Start with an accurate outline and keep front and back views consistent. Include visible seams, openings, pockets, fastenings, cuffs, hems and other details that affect the design.
Use a clear line hierarchy. The outer silhouette should not disappear among tiny stitch marks. Different line styles can distinguish construction features, but explain any convention that could be misunderstood.
Add enlarged detail views where the main drawing is too small. A concealed fastening, pocket opening or collar construction may need an additional view and a short note. The aim is to remove avoidable ambiguity rather than make the page look complicated.
An overshirt example
Imagine an olive overshirt with a button front, two chest pockets and buttoned cuffs. A fashion illustration might show it worn open over a T-shirt, with rolled sleeves and a relaxed pose. That is useful for communicating the intended look.
The technical flat should show the same garment without the pose obscuring its features. The front view needs the collar, placket, pocket shapes and cuff openings. The back view should show the yoke or seams actually intended, not details copied from a generic template.
If one pocket has a hidden internal compartment, a front view alone may not explain it. Add a detail or inside view. If the sleeve can be rolled, distinguish a styling choice from a sewn tab or fastening that must be manufactured.
The corresponding tech pack then adds materials, measurements, construction instructions and version control. Our illustrated tech-pack guide explains how those pieces fit together.
Colourways need more than a filled-in outline
A colourway is a version of the design in a particular colour combination. Keep garment components separate enough that you can specify the body fabric, lining, rib, thread, buttons and print where relevant.
A screen colour is a visual reference, not a final physical approval. Agree how colour will be specified and assessed with the supplier. Fabric, surface texture, lighting and display settings can all affect appearance.
Give each version a clear reference so a navy drawing is not accidentally paired with the olive material notes. If a design has contrast panels, label the components consistently across the drawing and materials list.
Which software do you need?
Vector drawing tools are useful for clean line work, reusable components and scalable artwork. Adobe Illustrator is one option; Inkscape is an alternative for vector work. Pattern-making and 3D garment tools address different tasks, so choose according to the output you actually need.
You do not need to learn every program at once. Begin with garment observation, proportion and clear communication. Software can repeat a line neatly, but it cannot decide whether the pocket is functional or whether the drawing agrees with the intended construction.
Our guide to fashion design websites and tools groups resources by purpose. Check current access, file compatibility and learning requirements before committing to a workflow.
Can you start with a template?
A well-made template can save setup time, but review every inherited detail. A standard shirt block may contain a seam, dart or cuff shape that your design does not use. Leaving it in can communicate an unintended instruction.
Check the template’s licence for your intended use. Keep a clean master and save a separate working version for each product. Do not treat a library drawing as evidence that a new design has been technically resolved.
A practical drawing exercise
- Choose a simple garment you own and place it flat in good light.
- Observe the outline, seams, openings and fastenings before drawing.
- Create front and back views with consistent proportions.
- Add one enlarged detail that would otherwise be unclear.
- Compare the drawing with the garment and remove accidental differences.
- Ask someone else to explain the design from your drawing and note their questions.
This is an observation exercise, not a way to claim someone else’s design as your own. For an original project, use the same checking process to make your intended changes explicit.
Check the handover before sending files
Agree the deliverable formats with the recipient. They may need an editable source file as well as a PDF for review. Confirm page size, image clarity, linked assets, fonts and naming conventions. A screenshot of the artwork is rarely an adequate substitute for the agreed working files.
Use a style code, revision date and clear version name. Check that the front and back agree, colourway references match and superseded details have been removed. Keep a record of which version was approved.
Finally, ask whether the drawing answers the questions required at this stage. A concept review may need only a clear shape and direction. Production requires a fuller specification. Understanding that difference is more useful than making every CAD look equally finished.


